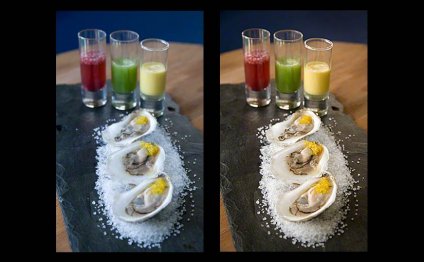
Photography color Correction
 Knowing how to calibrate your monitor is important for just about any professional photographer who desires accurate and predictable photographic images. In the event the monitor isn't properly reproducing colors and colors, after that constantly used on picture editing and post-processing could actually be counter-productive. This tutorial addresses fundamental calibration when it comes to everyday photographer, and utilizing calibration and profiling devices for high-precision results. Furthermore, it assumes that throwing your old monitor and purchasing an innovative new one is perhaps not an alternative.
Monitor
MODIFYING BRIGHTNESS & COMPARISON
The easiest (but least precise) option to calibrate your show is simply adjust its brightness and comparison settings. This method doesn't need a shade profile for your monitor, so it is well suited for informal use, and for if you are not at your computer system and need to make some quick adjustments.
The photos listed here are designed to help you choose ideal brightness/contrast configurations. A well-calibrated monitor must be able to pass both tests, but if it cannot, then you will must select which associated with the two is most crucial. Either way, make sure that your display has first already been provided at least 10-15 moments to warm-up.
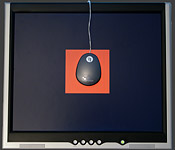 (1) Mid-Tones. Having well-calibrated mid-tones is generally the highest-priority goal. These types of a monitor should depict the central square as the same shade given that solid outer part — when seen out of focus or well away. The leftmost and rightmost squares also needs to appear darker and less heavy compared to solid grey, correspondingly.
© 2004-2015 Sean McHugh
Note: the above mentioned calibration assumes that your particular monitor is set to gamma 2.2.
In the event that central square is lighter or darker compared to exterior grey area, your screen is probably depicting images lighter or darker than meant. This may also have a noticeable affect your prints, so it's a thing that should-be dealt with.
If you use a LCD monitor, initially put your show to its standard contrast (this tends to be both 100% or 50percent), after that adjust the brightness before main square blends in. If you are using a CRT monitor (the more expensive "old-fashioned" type), after that rather set it to optimum comparison. Both for CRT & LCD shows, make sure that these are set to gamma 2.2 if offered (most current displays come with this as the native setting).
 Note: increasing the brightness of your screen way too much can reduce its functional life time. You'll likely not need to own your show at its optimum brightness in the event that area isn't too bright, in the event that display isn't back-lit (such as for example in front of a window) of course the screen actually too old.
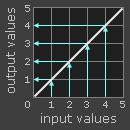
(2) Emphasize & Shadow Detail. If you've followed the earlier calibration, today your mid-tones will be reproduced approximately at the shade intended. But might mean that the shadows and features will appear too bright or dark, or vice versa. You need to be capable distinguish the 8 tones in all the two images below:
Shadow Detail Emphasize DetailBoth adjacent shaded rings at each exterior edge of this site ought to be only barely distinguishable. Otherwise you've probably reached the limit of just what brightness/contrast modifications alone is capable of. As an alternative, if maximal shadow and highlight detail tend to be more crucial than mid-tone lightness, you are able to overlook the mid-tone picture. In that case, first usage brightness to control shadow detail after which make use of contrast to manage highlight detail (for the reason that order). When brightness is too large, solid black colored will show up grey, nevertheless when it's also reasonable shadow clipping could make a number of the darker 8 shades look the exact same.
But the aforementioned examples basically crude adjustments that only address little portions of the tonal range, and don't fix colors whatsoever. You can find somewhat more accurate methods online for aesthetic calibration, but ultimately, achieving really precise results needs systematic and unbiased dimensions making use of a calibration product...
RELATED VIDEO

Share this Post
Related posts

Chicago wedding Photography prices
From start to finish. Your whole big day! And well before that time arrives, we take time to relate to you, we share our…
Read More
Typical Price for Wedding Photographer
Wedding Photography Prices for Maryland, Washington DC, and Virginia
Read Morelatest post
-
 Portrait, Wedding Photography May 9, 2024
 -
 Wedding Photography Information April 30, 2024
 -
 Wedding Photography Wiki April 21, 2024
 -
 Civil wedding ceremony venues April 12, 2024
 -
 Readings and poems for civil ceremonies April 3, 2024
 -
 Simple Wedding Photography contract March 27, 2024
 -
 Wedding Photography Deals March 19, 2024
 -
 Wedding Photographer Albums March 10, 2024
 -
 Wedding Photographer price range March 1, 2024